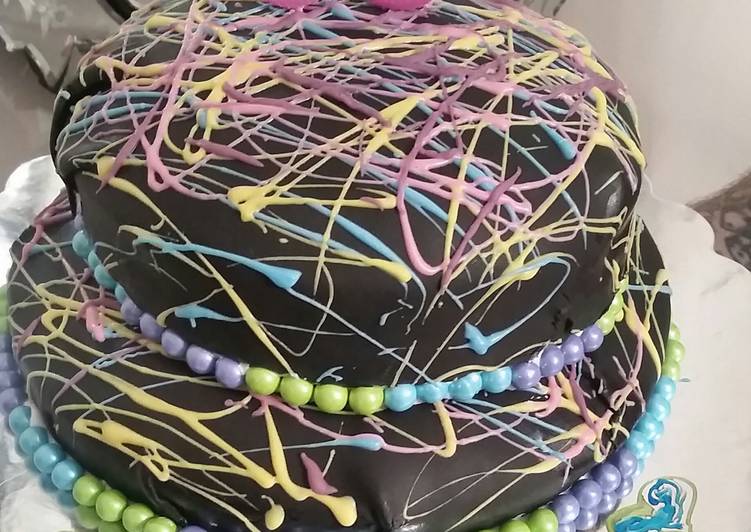
Hello everybody, welcome to our recipe site, If you're looking for new recipes to try this weekend, look no further! We provide you only the perfect Paint drip neon tie dye birthday cake😆 recipe here. We also have wide variety of recipes to try.
Before you jump to Paint drip neon tie dye birthday cake😆 recipe, you may want to read this short interesting healthy tips about Make Healthy Eating A Part of Your Life.
The benefits of healthy eating are these days being given more attention than ever before and there are good reasons for this. Poor diet is a leading factor in diseases such as heart disease and hypertension which can put a drain on the economy. Although we’re constantly being encouraged to adopt healthy eating habits, it is also easier than ever to rely on fast food and other convenience items that are not beneficial for us. It is likely that a lot of people believe it will take great effort to eat a healthy diet or that they have to make a large scale change to the way they live. Contrary to that information, individuals can alter their eating habits for the better by implementing a couple of small changes.
One initial thing you can do is to pay close attention to the choices you make when you’re at the grocery because you most probably buy lots of items out of habit. As an example, if you have a bowl of cereal for breakfast, do you ever stop to see what the sugar and salt content is before buying? One healthy alternative that can give you a great start to your day is oatmeal. Mix in fruits or spices to improve the flavor and now you have a breakfast that can become a normal part of your new healthy eating regimen.
To sum up, it is not difficult to start to make healthy eating a regular part of your daily lifestyle.
We hope you got insight from reading it, now let’s go back to paint drip neon tie dye birthday cake😆 recipe. To make paint drip neon tie dye birthday cake😆 you need 13 ingredients and 8 steps. Here is how you achieve it.
The ingredients needed to make Paint drip neon tie dye birthday cake😆:
- Prepare 2 boxes of tye dye cake mix
- Take 1 homemade buttercream frosting or can of wilton buttercream frosting
- Provide 1 Box of premade black fondant
- Prepare 1 Box of neon gel food coloring
- Get 1 bag pink candy melts
- Take 1 bag yellow candy melts
- Get 1 bag blue candy melts
- Provide 1 can white frosting
- Use 3 little bags of sixlet colored chocolate candy balls-Blue, Purple & Green
- Provide 3 empty clear condiment squirt bottles
- Take 6 disposal cups
- Take 2 10inch cake pan
- You need 2 8 inch cake pan
Steps to make Paint drip neon tie dye birthday cake😆:
- Pre heat oven to 350. Mix both cake boxes as directed. Then grab your 12 disposable cups. Measure 1 1/2 cups of batter in each of the 6 cups. Now grab your neon food coloring gel & add them to each cup to make individual different colors you want your layers to be.
- Once you have you 6 cups of of cake batter colored to your liking. Then grease your pans & begin adding your cake mix to the pans. Pour a 1/4 cup of the 1st color you choose directly in the middle of your 10inch cake pan. Add another 1/4 cup of another color directly in the middle on top of the other cake that was poured.
- The cake will spread in the cake pan by it self. Do not shake of manipulate it. Keep pouring 1/4 of each color just one time for each color. Grab your 8 inch pan & do the same thing. It should look like this!
- Place both pans in oven side by side. Cook for about 25 mins or untill you stick a toothpick in the middle of the cake & it comes out dry not wet on the toothpick. Take out & let cool completely for about 15 mins. Then pour the rest of the batter in your other 10 inch & 8 inch pans like you did before. One layer at a time. Place that 2nd batch in the oven like you did the 1st batch. Let cool completely. While cake is cooking. Spit the fondant in half. Knead the fondant & roll out enough to cover the two layers for your cake.
- While cakes are cooling either you can make your buttercream frosting or use a container of wiltons already made buttercream frosting. Once your 4 cakes are cooled completely. Place a medium size circle of the buttercream frosting on top of the 10 inch cake. Then place the 2nd 10inch cake on top of the other one. Place a nice layer of buttercream frosting on top of the both cakes. Smooth out. Next grab the two 8 inch cakes and repeat the same thing to it.
- Take your rolled out black fondant and place 1 of them on top of the stack of the 10 inch cakes. Smooth out the best you can.Then do the same with the other rolled black fondant to the 8 inch cakes. Now your two layered cake is almost done. Squirt a nice glob of white can frosting on top of the 10 inch cake. Then place your 8 inch fondant covered cake on top of the 10 inch fondant covered cake.
- Grab your candy melts place them in your condiment containers. Add 1/4 teaspoon of vegetable oil in each container to help thin the melts out. Place each in the microwave for 30 second intervals. Once the melts are melted down. Drizzle them on the two layered of the cake in a zigzag zag & swirl pattern. One color at a time.
- Take the white frosting can and squirt along the seams of the two layers of the cake. Add the sixlet candy balls to that frosting seams all the way around the two layers. EAT AND ENJOY!!!
TOUCH this image to discover its story. It seems that tie dye clothing and accessories are appearing everywhere, from dresses and We are fully onboard the tie dye train here at The Neon Tea Party and are SO excited to share our best tie dye tutorials and tips with you in this blog post! What's better than a slice of cake? A birthday cake fit for a true rainbow lover! Rainbow buttercream frosting roses adorn this colorful layer cake.
If you find this Paint drip neon tie dye birthday cake😆 recipe helpful please share it to your good friends or family, thank you and good luck.